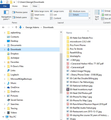
How to ungroup images in Select Image File option
Just installed latest Windows 10 update 1903 Build 18362.175. The default for File Explorer is grouped files, however, File Explorer gives you the option to ungroup files by clicking "View" / "Group By" / "None", which I have selected for all File Explorer operations. When I compose an email using Thunderbird 60.7.2 and select "Insert" / "Image" / "Choose File" I get a grouped listing of available images in the selected folder. I don't want the images grouped, I want them ungrouped so I can sort them either Alphabeticaly or by Date. The Thunderbird Select Image pop-up has no option to ungroup images. How do I ungroup them????
被采纳的解决方案
All I can suggest is what this article suggests to get to the hidden Windows menu (yep the open dialogs are part of windows) https://www.ghacks.net/2019/03/29/how-to-disable-file-groups-in-open-dialogs-in-windows/
定位到答案原位置 👍 1所有回复 (4)
Interesting...I'm on Win 10 and no files were auto grouped. Whether I group them or not, it is not effecting Thunderbird.
Assuming you tried to insert an image in Thunderbird before accessing the files to ungroup. Maybe the file location has been stored in the Config files.
In Thunderbird
- Exit any open 'Write' windows.
- Menu icon > Tools > Clear Recent History
- Time range: everything
- Under 'details' select 'cache'
- click on 'Clear now'
- Menu icon > Options > Advanced > 'General' tab
- click on 'Config Editor' button
- In 'about:config' window in search type: image
- Right click on this line 'editor.lastFileLocation.image' and select 'reset'.
- close window - top right X
- click on 'OK'
click on 'Write' Try Insert > Image again.
Did the suggested procedure to the letter, but I'm still getting the image files listed by time groups, and still don't know how to adjust it to get them listed alphabetically. I've attached two pics; one showing how File Explorer lists the Download directory files alphabetically, and one showing how Select Image File sorts them by time groupings.
选择的解决方案
All I can suggest is what this article suggests to get to the hidden Windows menu (yep the open dialogs are part of windows) https://www.ghacks.net/2019/03/29/how-to-disable-file-groups-in-open-dialogs-in-windows/
YES!!! Problem Solved!!! Thank you for doing the research and finding the answer to yet another Microsoft induced problem. I have included below my note to myself as how to solve this problem. Feel free to forward it to Mozilla Thunderbird, or anybody else who is stymied by this problem. Thanks again!!!
- Problem: Windows 10 version 1903 groups files automatically in open dialogs such as Thunderbirds Select Image File option, showing them in groups such as "today", "yesterday", and "earlier this week". There is no View menu to un-group or sort the files sorted alphabetically or by date.
- Solution: When desiring to insert an image file into a Thunderbird email, click Insert / Image / Choose File; then in the Select Image File dialog pop-up, right-click on a blank space in the file listing, e.g. on the right, to get a pop-up menu. Click Group By and select (None) to disable the automatic grouping of files in open dialogs. The groupings will disappear. To set the way you want files to be viewed and sorted in open dialog boxes, right-click an open space in the listing again; then click View and select your desired viewing choice; and click Sort and select your desired sort choice


