Backup or copy message list of not-downloaded messages
Hi,
I have changed the provider of e-mail services. The old IMAP account is already expired (not reachable).
I wanted to copy the messages from the old account to the new one. Unfortunately, it turned out that some messages contents are missing* (not downloaded locally). I acknowledge there's nothing I can do anymore to get the message contents.
However, I would definitely want to keep the records of the messages — their subject, correspondents, date and time. Can I get the message list in any form (other than taking screenshots) from Thunderbird? How to do it?
I have tested (not to work): - Copying / moving the directory from the context menu to the new account has no effect. - Dragging the individual messages has no effect as well. - After entering the Offline mode (from `File` menu) those actions result it a prompt informing that messages are not downloaded. - I tried copy-pasting the .msf file, directory and directory.sdb for the IMAP directory (with not-downloaded messages) from "ImapMail" of the profile to the "Mail" (local folders) to see if that would work, but it unfortunately haven't. - The .msf files do not contain the data (subject, correspondents, datetime).
- all the messages in question have been opened in Thunderbird. Therefore I thought I have them all on my local drive. I haven't rushed to copy the messages, because I have backed up the Profile directory (including ImapMail). Perhaps after organizing the mails (i.e. moving to appropriate IMAP directories) the local copies were deleted, and new copies (in target IMAP directories) not downloaded (as I haven't opened them anymore).
選ばれた解決策
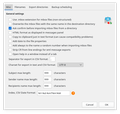
See if you can create an index with ImportExportTools NG (see picture).
この回答をすべて読む 👍 1すべての返信 (3)
Thank you very much! This is exactly what I needed. I haven't yet figured out if the time (not only the date) can be saved too, but it is great already.
If anyone was looking — to include the time in export files (applies to both HTML and CSV) you can change the format in the Add-on settings (see the screenshot).


